
Step by step
- Install eXeLearning on your system
- Click on the eXeLearning icon on your desktop to start the software
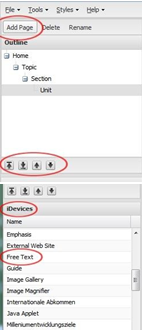
- You will see three main parts on your screen:
- the outline pane (top left, for your module structure)
- the iDevice pane (bottom left, for instructional elements)
- the main pane (right side, here you assemble your material)
- Change the program language to your needs (main menu: Tools/Preferences)
- Add pages according to your content structure. Click Add Page to add additional pages (the system always adds in the structure below the active page.
- With the arrows on the bottom of the outline window, you can sort the screens in structure and sequence.
- Now you can start adding content to your pages. Select the page in the outline window where you would like to add
- Now go to the iDevice window below. iDevices are instructional elements that you can use to populate your screens. Select the “Free Text” iDevice. After you click “Free Text”, an editor window is shown which works much like your standard MS Word editor.
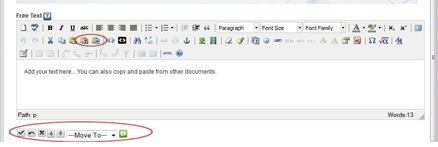
- Add text into your screens. You can type or copy from existing documents. If you copy from MS Word, please use the “Copy from Word” icon. When you are finished, click on the checkmark at the bottom of the iDevice to save: This is true for all iDevices. You can also go back to a previous state or delete iDevices.
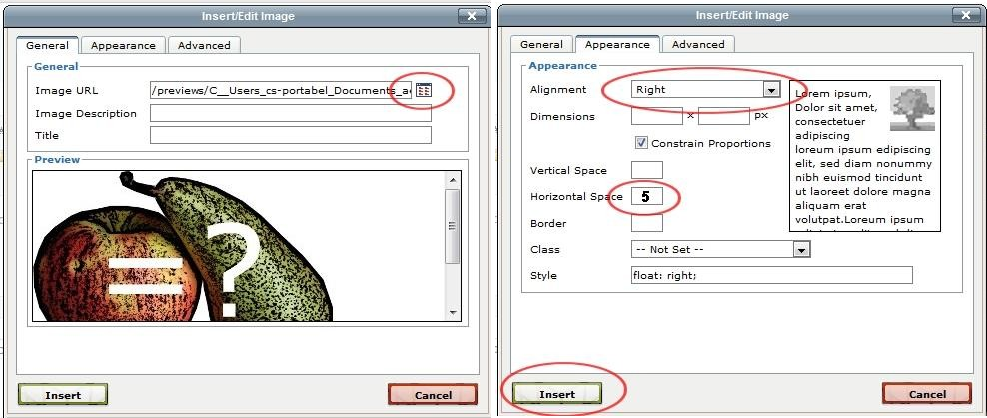
- To add images from your computer, click the “image” icon in any iDevice Editor window. The image has to be saved locally Copy & Paste is not possible. Choose the image from your computer (or a connected drive) by clicking on the folder symbol. Then go to the “Appearance” tab and choose how you would like your image to appear (e.g. right side of your screen with text wrap). Add some “Horizontal Space” to avoid the image sticking to too close to the text. Click insert.
- If you want to add other media (movies or Flash files elements), the process is similar, just use the “Movie” icon next to the “image”
- If you want to add self-tests to your module, you can choose from the following iDevices: Multi- Choice (select one) , Multi-Select (select many), Reflection, True or False, Matching, Fill the Gap. Add your questions and options in the iDevice text editor, be sure to select the correct
- Try out other iDevices, for example the Image Gallery or the Magnifying Glass. There are many instructional
- Save your work! First, please save your eXeLearning package. Go to File/Save As… of your eXeLearning Window (not of your browser Menue). Save your work in a location of your choice (file format is *.elp).
- Export your work so you can use it on the web, review it or publish it on an Go to File/Export/Web Site/ Choose “Self-contained Folder” to export for immediate review. Look for the index.html file in this folder to open your package. Choose ZIP or SCORM export for upload to LMS. You can always edit your package further by working with the *.elp file and re-export later.
Output & Objectives
An authoring tool
Output & Objectives
An authoring tool provides an envi- ronment, in which content matter experts without programming skills can develop eLearning content. This content then can be deployed on different Learning Management Systems. eXeLearning is such an authoring tool. This recipe assist you in developing your own modules.
Ingredients
• Software eXeLearning (can be ownloaded from www.exelearning.net) • Digital text material • Digital images
Tips & Tricks
• Be certain to save your work regularly. eXeLearning does not auto-save.
Post Views: 119
Share via: